
Guides · Money
M-Pesa Explained: Kenya's Mobile Money for Newcomers (2026)
M-Pesa Explained: Kenya’s Mobile Money for Newcomers (2026)

In Nairobi, your phone is your wallet. M-Pesa is the mobile-money service that runs daily life here — you’ll use it to pay the taxi, the supermarket, the fruit seller, your rent, your power bill and your house help, often before you’ve even opened a bank account. Cash still works, cards work in malls, but M-Pesa is the thing everyone reaches for, dozens of times a week.
The good news: it’s simple, it’s cheap, and you can be up and running within an hour of landing. You don’t need a Kenyan ID, a local bank account or a work permit to start — a passport and a Safaricom SIM are enough. The friction is small and mostly about knowing the words: Send Money, Buy Goods, Pay Bill, Pochi, Hakikisha. Learn those five and you’ll move money like a local.
This guide is for Americans setting up M-Pesa for the first time. We’ll cover what it actually is, how to get a SIM and register as a foreigner, how to load and spend money, the fees and limits for 2026, how to wire it to your bank, how to get dollars in from home, and how to avoid the handful of scams that target newcomers. Every figure is kept to a 2026 range with the official source to check against, because tariffs and rates move.
The quick version (TL;DR)
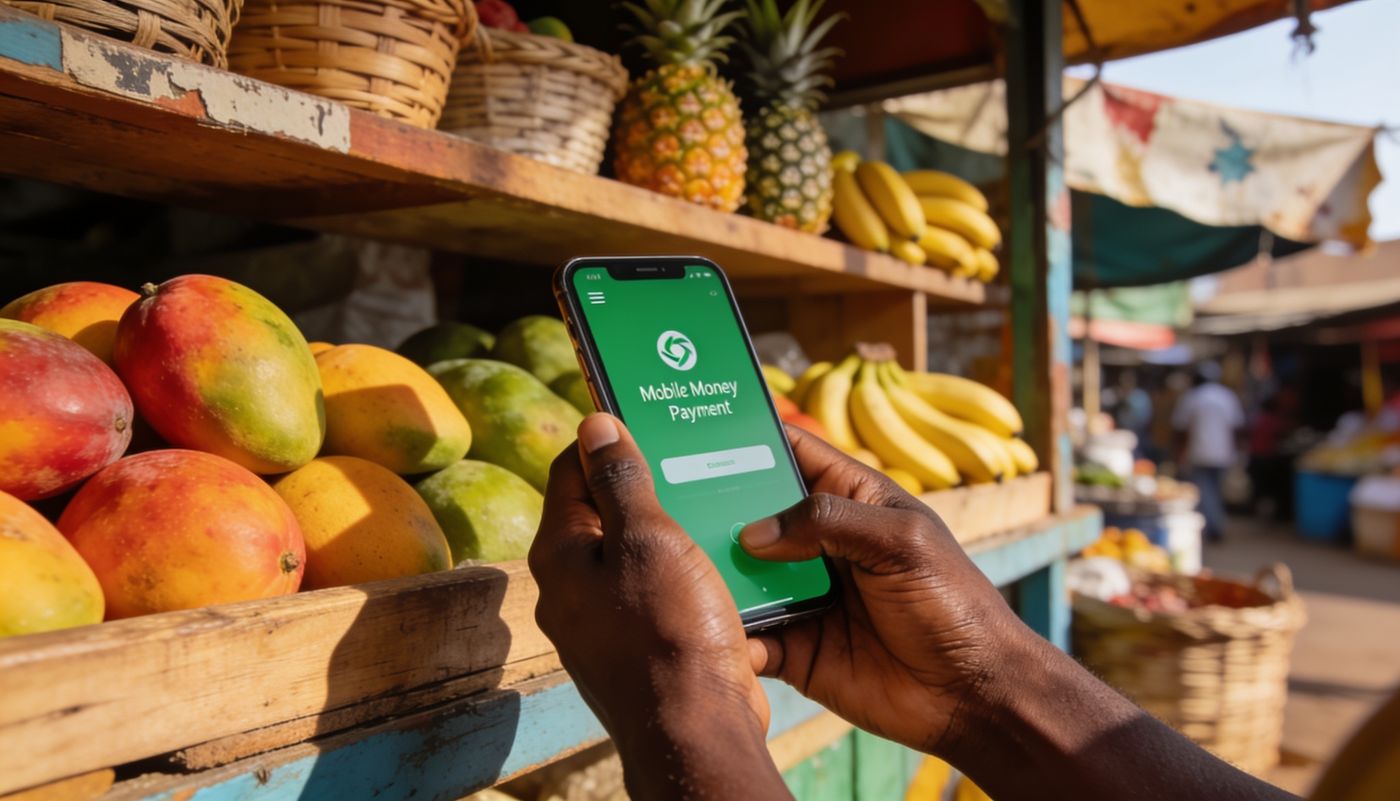
M-Pesa is Safaricom’s mobile-money wallet — money that lives on your phone number instead of a card. As a foreigner you register it with your passport at a Safaricom shop (including the desk at the airport), not at a regular street agent. The SIM costs about KES 100; opening M-Pesa is free. You add cash by handing it to any M-Pesa agent, and you spend it four main ways: Send Money to a person, Buy Goods to pay a shop’s till, Pay Bill for rent and utilities, and Pochi la Biashara for market vendors and motorbike riders. Small sends and all till payments are free; bigger transfers and cash withdrawals cost a little. As of June 2026 the wallet caps at around KES 500,000 and single transactions at about KES 250,000. Once you have a Kenyan bank account you can link the two so money flows between them instantly — see our banking in Nairobi guide. Until then, M-Pesa alone covers almost everything.
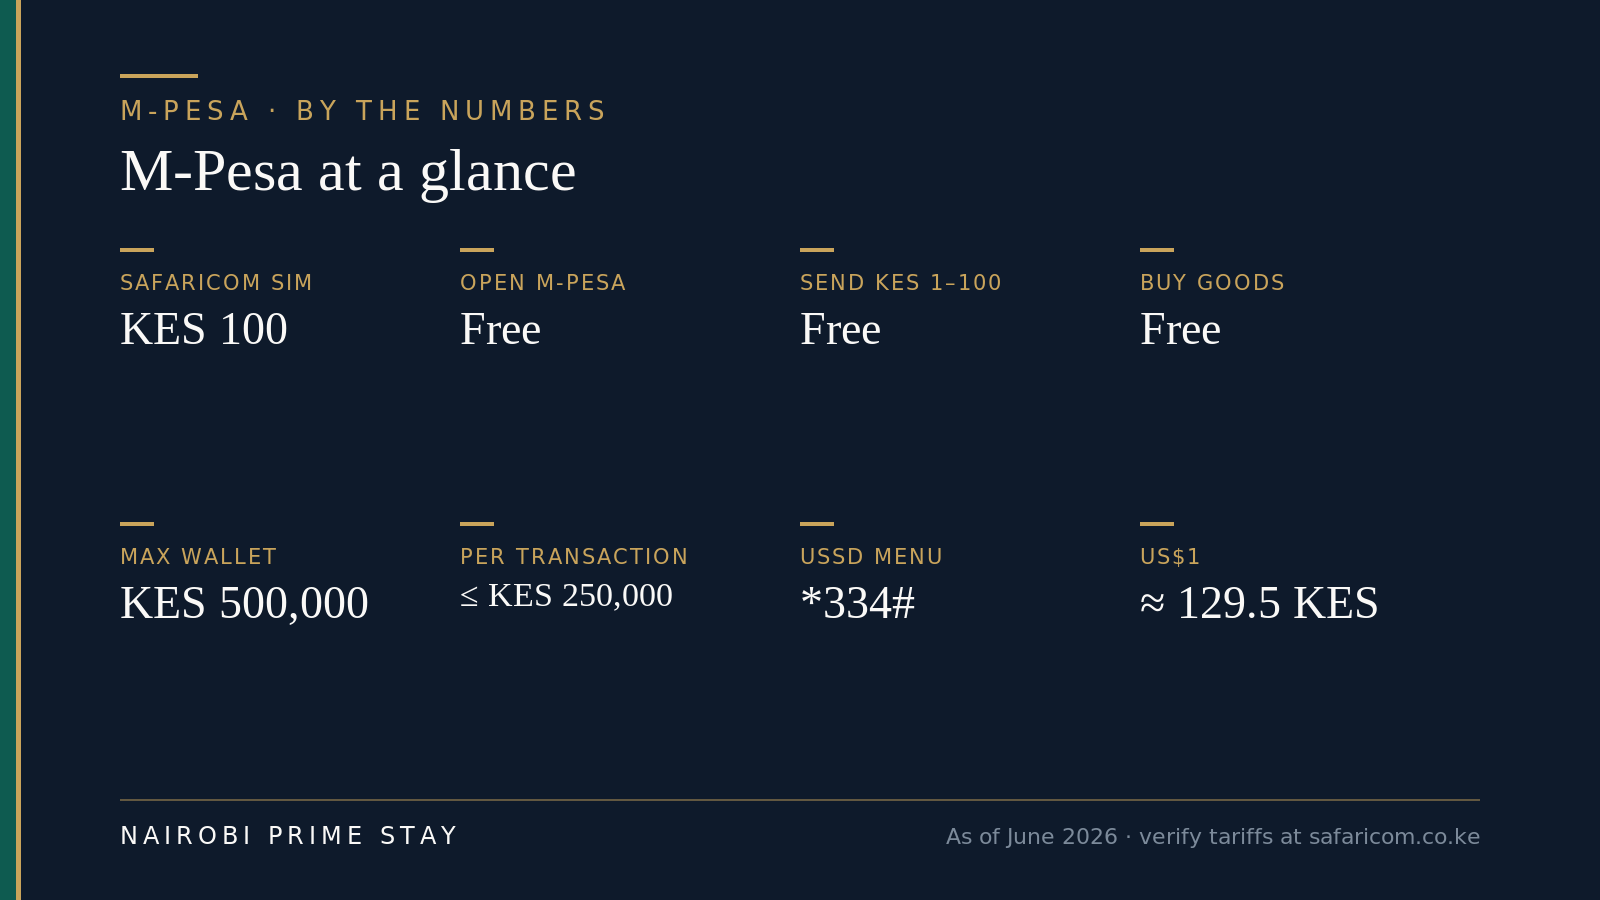 Indicative 2026 figures for orientation — tariffs and limits change, so confirm with Safaricom and the Central Bank of Kenya.
What is M-Pesa, really?
M-Pesa is a mobile-money wallet run by Safaricom, Kenya’s largest mobile network. Your balance lives on your phone number, not on a plastic card. You top it up with cash, then send and spend it straight from your phone — no bank account required. “Pesa” is Swahili for money, and the “M” is for mobile.
It launched in 2007 and quietly changed the country. Today most Kenyan adults use it, and it handles a huge share of the nation’s everyday payments. That’s why a market trader, a Java House café and your landlord all take it without blinking. For a newcomer, the practical effect is simple: you rarely need to carry much cash, and you almost never need exact change.
Two things make it feel different from a US payment app like Venmo or Cash App. First, it’s tied to your SIM, so it works on any phone — a basic feature phone or a smartphone — and even without mobile data, using a simple keypad menu. Second, it’s woven into everything: bills, salaries, school fees, even buying airtime and small loans all run through it. It’s less an app and more the plumbing of daily money here.
Why M-Pesa matters when you’re new
Because it’s how you’ll pay for your first week, before the slower stuff is sorted. Opening a Kenyan bank account takes a residence permit and a tax PIN, which can take weeks (we cover the sequence in our guide to opening a bank account as a foreigner). M-Pesa needs none of that. You can register it the day you arrive and immediately pay for taxis, groceries, a SIM-based fibre setup, and your serviced-apartment extras.
It also smooths the small daily friction that wears newcomers down. Ride-hailing apps like Uber and Bolt let you pay by M-Pesa. Your house help, the water delivery, the guy who fixes your geyser — all M-Pesa. Splitting a restaurant bill, tipping, topping up your own phone — M-Pesa. Once it’s set up, a whole category of “how do I pay for this?” questions just disappears.
One honest caveat: M-Pesa holds Kenyan shillings, not dollars. It’s for spending here, not for saving in your home currency. Keep your US bank and card open for international spending and dollar savings, and use M-Pesa as your local cash. The two systems complement each other rather than compete.
Getting set up: a SIM and M-Pesa as a foreigner
You need two things: a Safaricom SIM card and an M-Pesa registration on it. As a foreigner, the one rule that trips people up is where you register. A regular street-corner M-Pesa agent usually can’t process a foreign passport — only official Safaricom shops and Care desks can, including the Safaricom desk in the JKIA arrivals hall. So get your SIM and register M-Pesa at a proper Safaricom shop, not a kiosk.
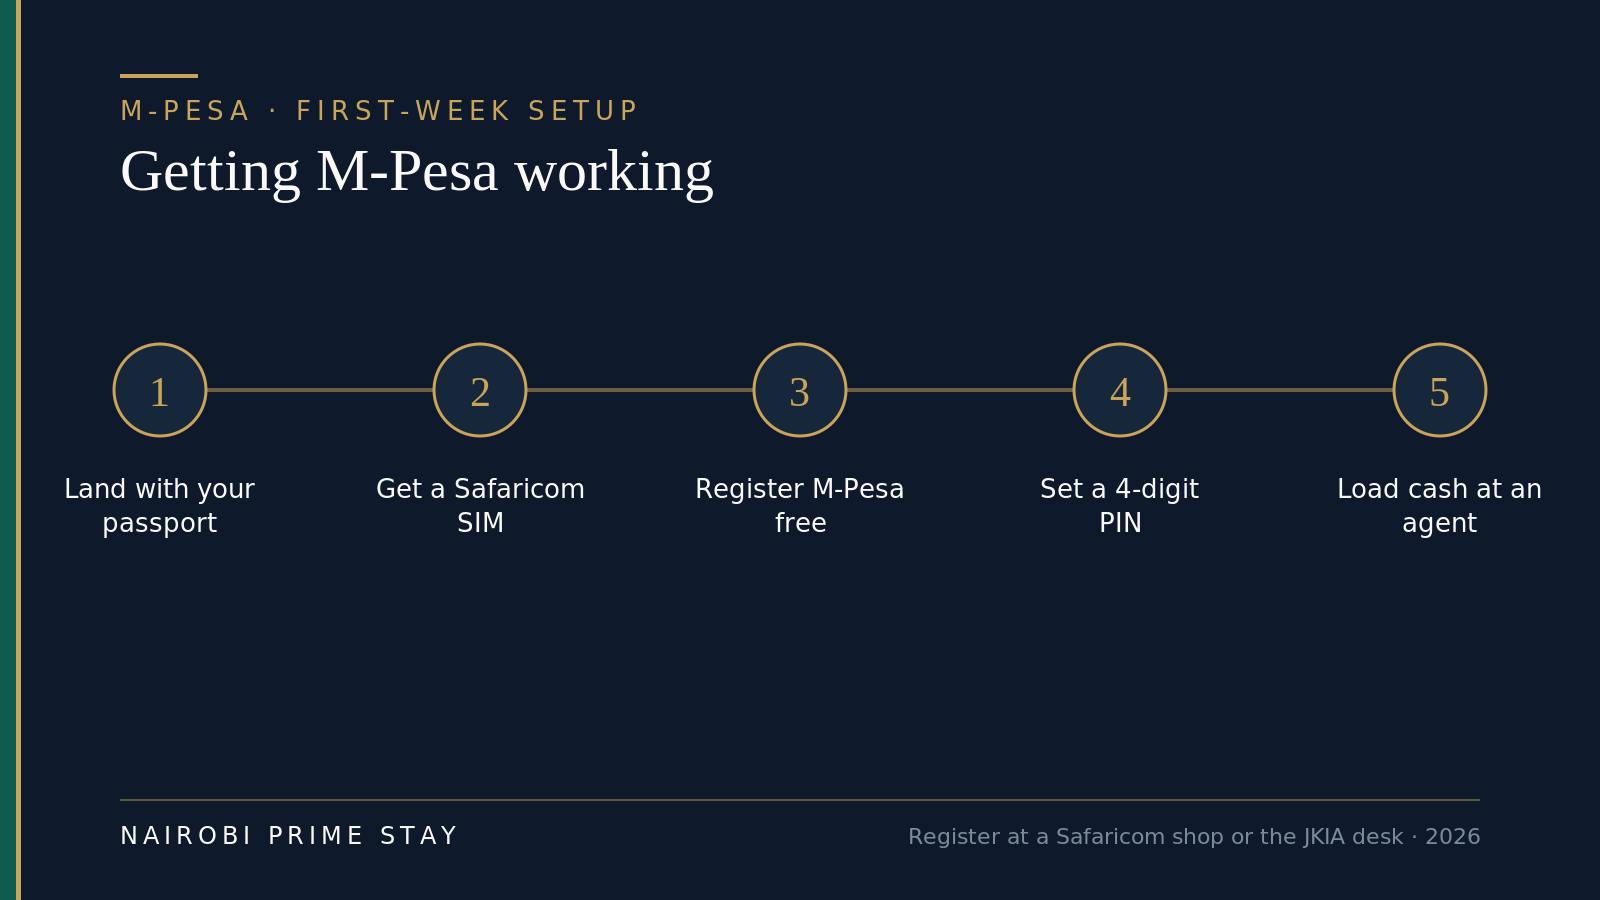 The whole thing takes minutes once you’re at the right counter.
Here’s the sequence:
- Bring your passport. The original, not a photocopy. SIM registration is a legal requirement in Kenya, so they’ll record your passport details.
- Buy a Safaricom SIM. It costs about KES 100 (a little over a dollar). Ask for a standard SIM or eSIM; the staff will activate it and give you your new Kenyan number, which starts +254.
- Register M-Pesa on the spot. Opening the wallet is free. The agent records your name, passport number, nationality and date of birth, and your account activates by SMS within a few minutes.
- Set a secret 4-digit PIN. You’ll be prompted to choose one. This PIN authorizes every payment, so memorize it and never share it.
- Load some cash. Hand cash to the agent (or any M-Pesa agent later) and they’ll move it onto your wallet. Now you can pay for things.
If you arrive late or skip the airport desk, any Safaricom shop in the city does the same thing — there are branches in every major mall (Sarit, Village Market, The Hub, Two Rivers, Westgate). Bring your passport and proof of where you’re staying if asked; a serviced-apartment booking works fine.
A quick note on tourists versus residents: you do not need to be a resident to use M-Pesa. Visitors on an eTA or short visa register the same way with a passport. The wallet doesn’t care about your immigration status — only your bank will, later on.
Adding and taking out cash
M-Pesa agents are everywhere — small shops with a green “M-PESA” sign, often several on a single street. They’re the cash machines of the system. To add money (called a deposit or “top-up”), you hand the agent cash and your phone number, they push the equivalent e-money to your wallet, and you both get a confirmation SMS. Depositing your own cash this way is free.
To take money out (a withdrawal), you tell the agent the amount, approve it on your phone, and they hand you cash. Withdrawals carry a small fee that rises with the amount — a few tens of shillings for small sums, more for large ones. You can also withdraw at many bank ATMs using M-Pesa, but agent withdrawals are usually cheaper.
A practical habit: keep most of your money where it earns its keep (your bank, or back home) and only hold spending money on M-Pesa. Withdraw cash inside malls and busy shops rather than at a quiet agent after dark — the same street-sense you’d use anywhere. We cover the wider picture in our Nairobi safety guide.
One newcomer surprise: occasionally an agent is “out of float” — they’ve run low on either cash or e-money and can’t complete your transaction. It’s normal. Just walk to the next agent; there’s almost always one within sight.
The four ways to pay
This is the heart of using M-Pesa. There are four payment “rails,” and once you know which is which, you’ll never be confused at a till again.
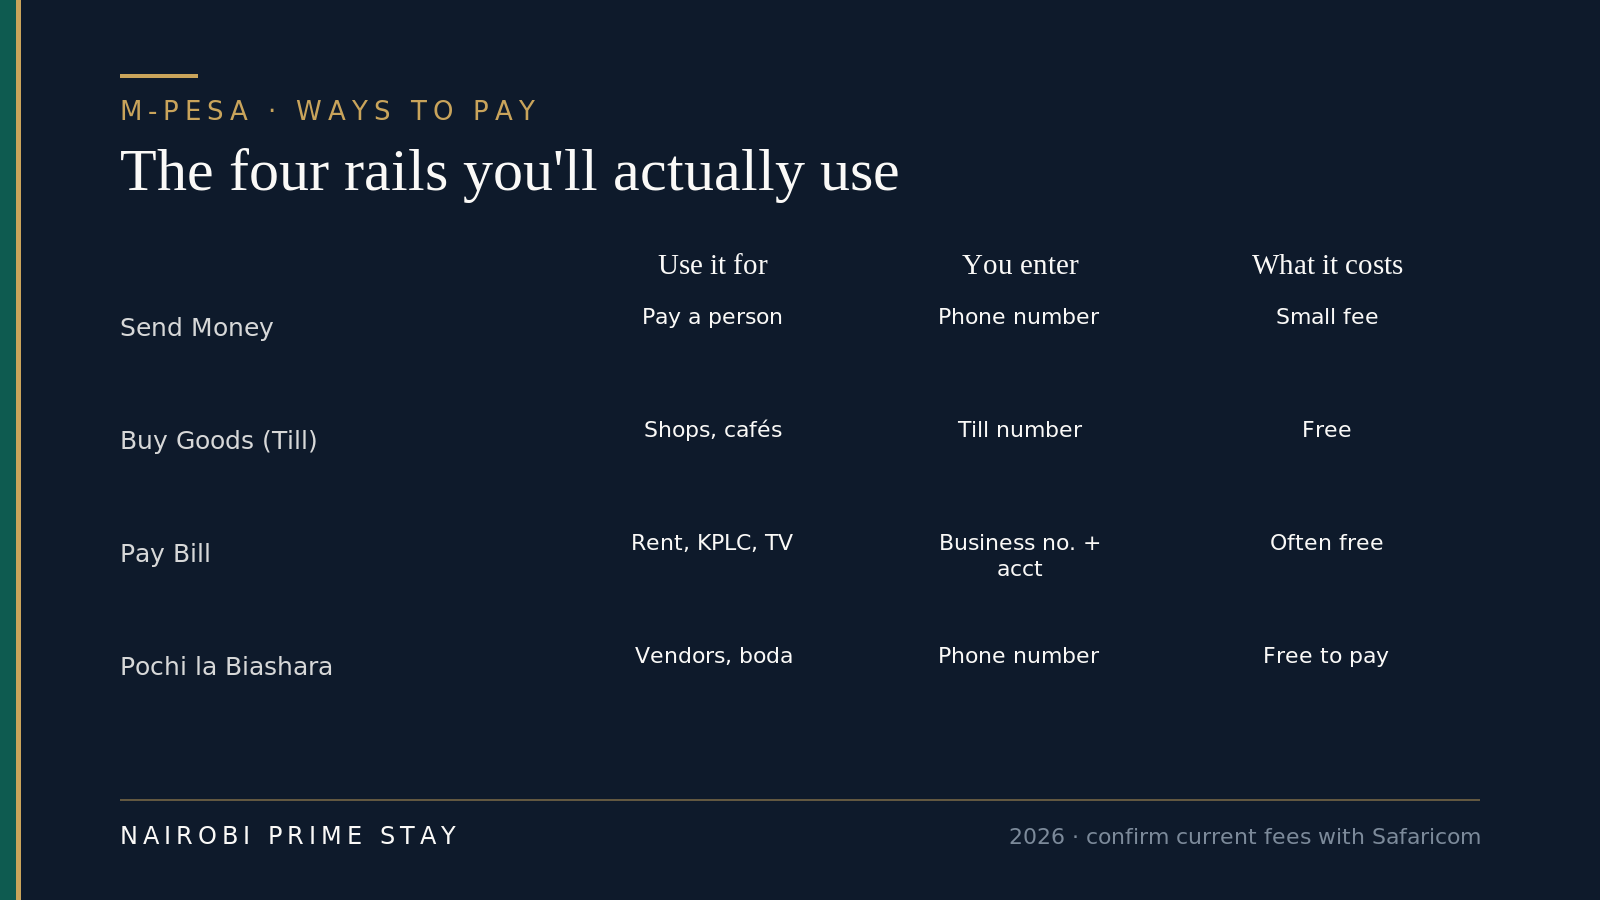 Confirm current fees with Safaricom — the shape is stable, the exact numbers move.
Send Money — paying a person
Use this to pay an individual: your house help, a friend, a landlord who wants it by phone number. You enter their phone number, the amount, and your PIN. Sending KES 1–100 is free; above that a small fee applies, rising with the amount but staying modest (think single-digit to low-double-digit shillings for everyday sums, more for large transfers). The person gets the money instantly.
Before you confirm, M-Pesa shows you the registered name of the number you’re paying — this is the Hakikisha (“make sure”) screen. Always read it. If the name isn’t who you expect, cancel. It’s your best defense against a mistyped digit or a scam.
Buy Goods — paying a shop (Lipa na M-Pesa)
Use this in supermarkets, restaurants, pharmacies and most established businesses. They’ll give you a Till number. You choose “Lipa na M-Pesa” then “Buy Goods and Services,” enter the till, the amount and your PIN. Paying a till is free — no transaction fee at all — which is why it’s the everyday workhorse. The shop’s name shows up before you confirm, so you know you’ve got the right till.
Pay Bill — rent, power and utilities (Lipa na M-Pesa)
Use this for bills and formal payments: rent, electricity tokens, your water bill, DSTV, internet, school fees. A Pay Bill has two parts — a business number and an account number (your meter number, tenancy reference, or customer ID). You enter both, the amount and your PIN. Many Pay Bill payments are free or carry only a small charge. This is how you’ll buy prepaid power: the national utility KPLC has its own Pay Bill, and you get a token code by SMS to type into your meter.
Pochi la Biashara — market vendors and riders
Use this for small, informal traders — the fruit seller, the boda-boda (motorbike) rider, the vegetable stall. Pochi lets them receive money to their phone number in a way that keeps their business money separate from personal sends. From your side it feels like Send Money: you pay to a phone number, and paying is free. If a trader says “lipa kwa Pochi,” just send to the number they give you.
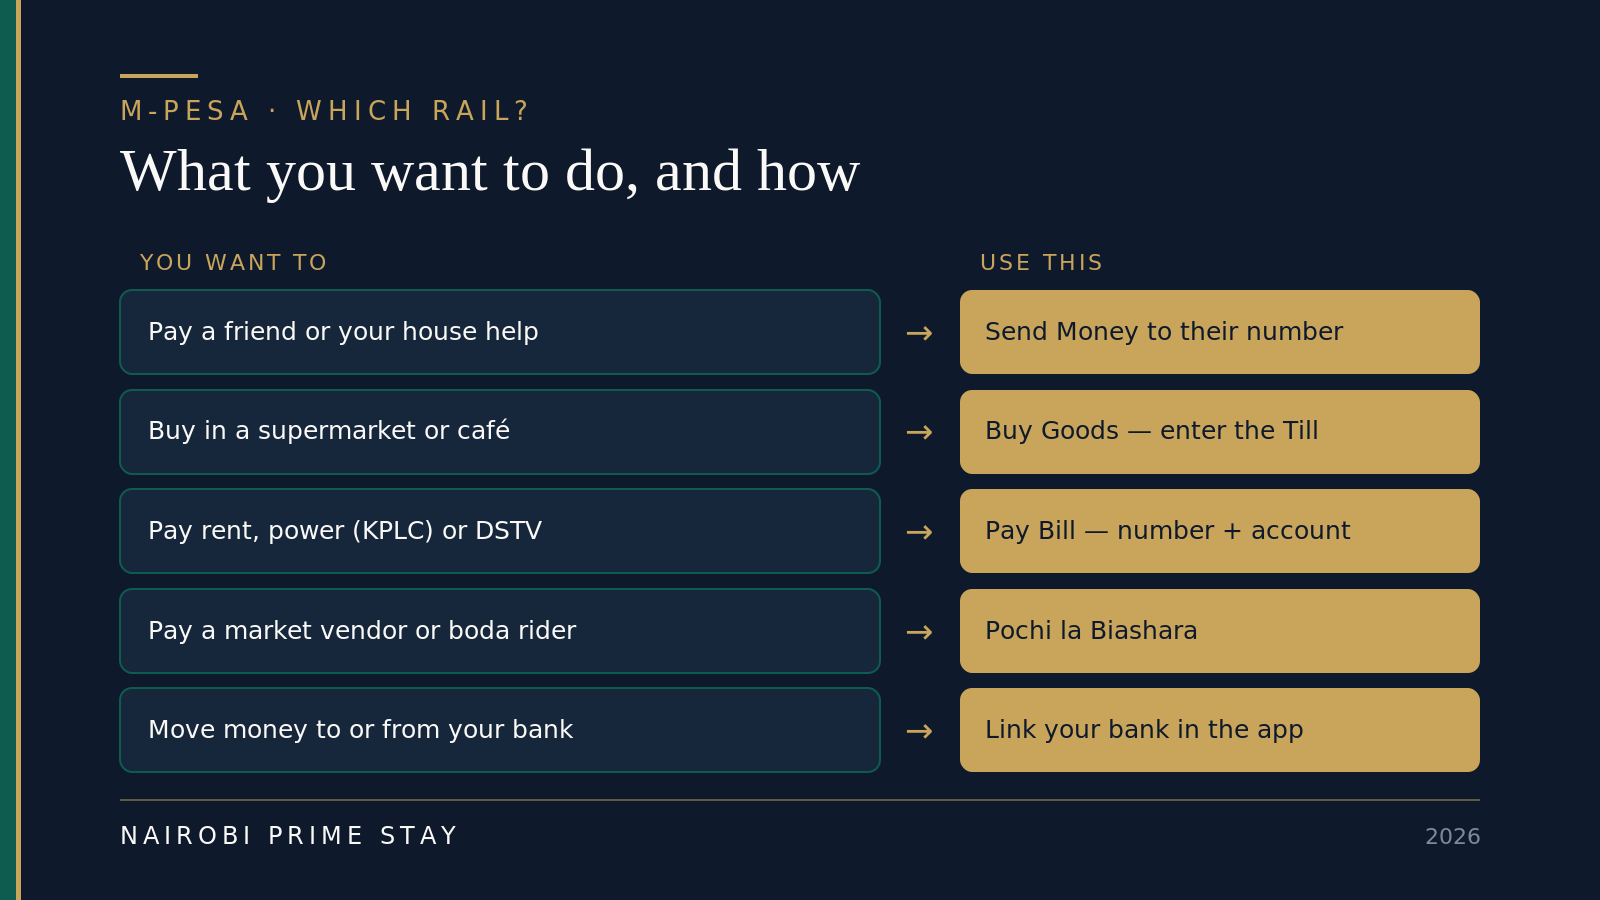 When in doubt, ask “Till, Pay Bill or Pochi?” — every business knows which one they use.
The app versus the *334# menu
There are two ways to drive M-Pesa, and both reach the same wallet.
The M-PESA app (free on iPhone and Android) is the nicer experience: a clean home screen, saved Pay Bill and Till numbers, your full statement, and easy access to extras like savings and bill splitting. If you have a smartphone, install it and sign in with your Safaricom number.
The *334# menu is the no-frills version that works on any phone, even without internet. You dial *334# like a phone number and a text menu appears — Send Money, Withdraw, Lipa na M-Pesa, My Account, and so on. It’s fast once you know the menu order, and it’s a reliable backup when data is down or your phone is low on battery. Plenty of Kenyans use only this.
Either way, every payment ends with you typing your 4-digit PIN, and every transaction generates a confirmation SMS with a reference code. Keep those SMS messages — they’re your receipts.
Fees and limits in 2026
M-Pesa is cheap, but not entirely free, and the rules are set partly by the Central Bank of Kenya. Here’s the honest shape of it as of 2026. Safaricom has kept its core tariff steady going into the year, but always confirm the live figures on safaricom.co.ke before you rely on them.
| What you’re doing | 2026 cost (indicative) |
|---|---|
| Registering / opening M-Pesa | Free |
| Depositing your own cash at an agent | Free |
| Checking balance, changing PIN, buying airtime | Free |
| Sending KES 1–100 to a person | Free |
| Sending more than KES 100 | A small fee that rises with the amount |
| Buy Goods (paying a Till) | Free |
| Pay Bill (rent, utilities) | Free or a small charge, varies by biller |
| Withdrawing cash at an agent | Small fee, rises with the amount |
| Withdrawing at an ATM | Usually more than an agent |
| Max single transaction | Around KES 250,000 |
| Max daily total | Around KES 500,000 |
| Max wallet balance at any moment | Around KES 500,000 |
A few things worth knowing. The limits above apply to a fully registered personal account; they exist for anti-money-laundering reasons, not to inconvenience you, and they’re far higher than daily life needs. If you’re moving large sums — say, a property deposit — that runs through a bank, not M-Pesa (see sending money to and from Kenya). And the send-money fee is genuinely small: for typical spending you’ll pay a handful of shillings, and paying tills costs nothing, so most days your M-Pesa fees round to almost zero.
Linking M-Pesa to your bank
Once you have a Kenyan bank account, you’ll want the two talking to each other. Linking is straightforward and makes daily life flow: keep your salary and savings in the bank, push spending cash to M-Pesa as you need it, and sweep money back when your wallet’s overfull.
You can move money bank → M-Pesa and M-Pesa → bank inside your bank’s app, or by using your bank’s Pay Bill number from the M-Pesa menu. Most banks let you top up your own M-Pesa for free, and it’s instant either way. Many Kenyans simply leave their salary in the bank and load M-Pesa once or twice a week. Our banking in Nairobi guide walks through which banks suit expats and how the linking works in practice.
There’s also PesaLink, a bank-to-bank instant transfer service that moves money between Kenyan banks without going through M-Pesa at all — useful for paying a landlord or agent who wants it straight to their account.
Getting money in from abroad
You’ll often want to move US dollars into your Kenyan spending money. A few routes:
- Wise and similar services convert USD to KES at a fair rate and can pay straight into your Kenyan bank account or, in some cases, your M-Pesa. This is usually the cheapest and most transparent option.
- M-Pesa Global lets people send money from abroad directly to your M-Pesa wallet, and lets you send out to wallets and bank accounts in other countries, within limits.
- Your bank’s wire works for larger sums but tends to cost more and move slower than Wise.
- Western Union, Sendwave, Remitly and similar remittance apps can deliver to M-Pesa or for cash pickup; compare the all-in rate.
Whichever you use, watch the exchange rate and the spread, not just the headline fee. As of June 2026 the US dollar buys roughly 129–130 shillings, and it’s been fairly stable through the year — but rates move, so check the live figure. Our USD to KES currency guide and sending money to Kenya guide go deeper on getting the best rate.
Things you’ll hear about: Fuliza, M-Shwari and more
A few names come up constantly. You don’t need any of them on day one, but it helps to know what they are.
- Hakikisha — not a product, but the confirmation step that shows the recipient’s name before you send. Your single most useful habit. Read it every time.
- Fuliza — an overdraft. If you’re short, Fuliza can top up a payment and you repay later, for a daily fee. Handy in a pinch for residents; not something a newcomer should lean on.
- M-Shwari and KCB M-Pesa — savings-and-loan products built into M-Pesa, run with partner banks. You can park small savings or borrow modest amounts. Useful later, ignorable at first.
- Lipa Mdogo Mdogo, Pochi, Pay Bill, Buy Goods — you’ve now met the payment ones that matter.
- Customer care — dial 100 from your Safaricom line (or 200 for postpaid) to reach Safaricom. Save it.
Staying safe on M-Pesa
M-Pesa itself is secure — every payment needs your PIN, and Safaricom’s systems are robust. Almost all losses come from social engineering: someone tricking you into sending money or giving up your PIN. The scams are predictable, so they’re easy to sidestep once you know them.
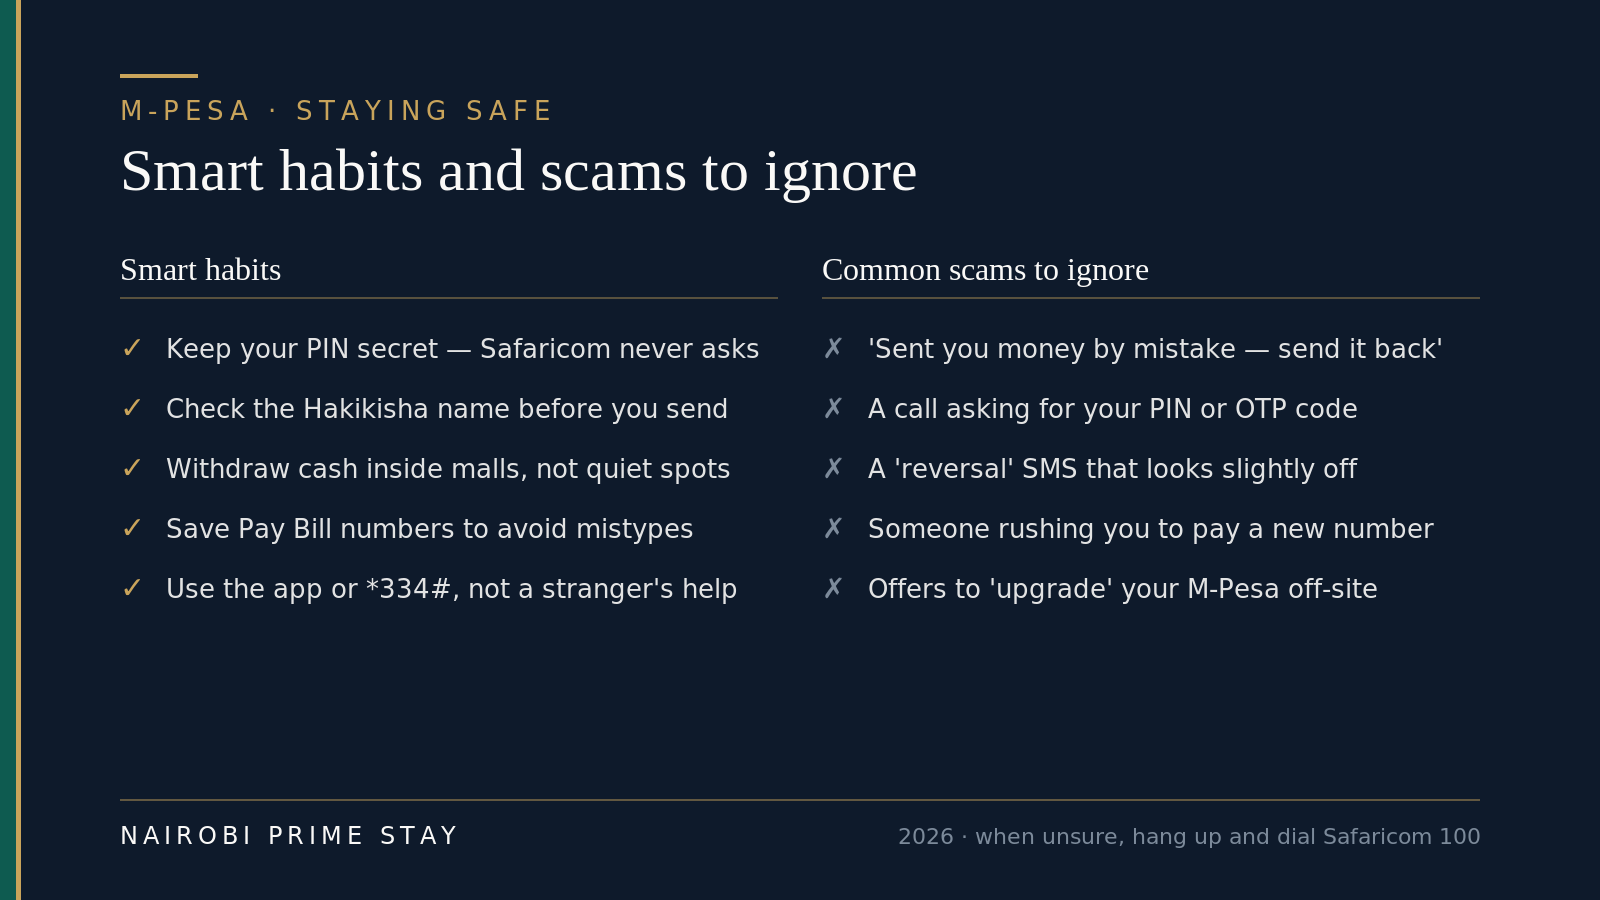 When something feels off, stop and dial Safaricom on 100 — a real transaction can always wait.
The golden rules:
- Your PIN is yours alone. Safaricom, your bank and any real business will never ask for it. Anyone who does is a scammer.
- The “wrong send” trick. A stranger claims they sent you money by mistake and begs you to send it back. The original “deposit” is fake or will be reversed; if you send, you’re out real money. Ignore it.
- Read the name before you pay. Hakikisha exists for exactly this. A mistyped digit can send money to a stranger.
- Beware fake SMS and calls. Scammers spoof messages that look like reversals or prize wins. Real M-Pesa messages come from “MPESA,” and they never ask you to call a number and key in codes.
- Guard against SIM-swap. If your line suddenly loses signal for no reason, it could be a SIM-swap attempt to hijack your M-Pesa — call Safaricom immediately.
Set a PIN you’ll remember but others can’t guess (not 1234, not your birth year), and you’ll be fine.
A typical first week
Here’s how it plays out for a remote worker landing in Nairobi for a long stay.
She clears immigration at JKIA, walks to the Safaricom desk in arrivals, and shows her passport. Ten minutes later she has a Kenyan SIM and a registered M-Pesa wallet, with about KES 15,000 of cash loaded for the week. She books a Bolt to her serviced apartment and pays the driver by M-Pesa without touching cash.
Over the next few days she pays for groceries at Carrefour by Buy Goods (free), tops up her phone data from the app, sends her cleaner her fee by Send Money, and buys prepaid power through the KPLC Pay Bill — a token arrives by SMS and she keys it into the meter. When her wallet runs low, she walks to the M-Pesa shop downstairs and tops up. None of it required a bank account.
By week three her residence permit and KRA PIN come through, she opens a Kenyan bank account, and links it to M-Pesa. Now her dollars land via Wise, sit in the bank, and she loads M-Pesa as needed. The system clicks into place — and she barely thinks about it again.
M-Pesa, a card, or cash — when to use each
M-Pesa is the default, but it’s not the only way to pay. Here’s the honest split for an expat.
| When you’re paying for… | Reach for | Why |
|---|---|---|
| Taxis, groceries, rent, bills, people, market stalls | M-Pesa | The everyday default — fast, accepted everywhere, low or no fees |
| Malls, hotels, flights, fuel, international websites | Card (Visa/Mastercard) | Widely accepted in formal places; keep a US card for overseas sites that decline Kenyan cards |
| Tips, tiny informal buys, a parking attendant | A little cash | Handy to carry a small amount; you’ll rarely need much |
| Big one-off sums — property deposit, a car | Bank transfer | Above M-Pesa’s limits; goes bank-to-bank or via PesaLink |
Most weeks, M-Pesa covers eighty per cent of what you pay for, a card covers the malls and online life, and a few hundred shillings of cash covers the rest.
Pros and cons
| What’s great about M-Pesa | The honest downsides |
|---|---|
| Works on any phone, no bank account needed | Holds shillings only — not for dollar savings |
| Set up in minutes with just a passport | Foreigners must register at a Safaricom shop, not a street agent |
| Accepted almost everywhere, by everyone | Needs a charged phone and your Safaricom line working |
| Paying tills and small sends are free | Cash withdrawals and big sends carry small fees |
| Instant, with an SMS receipt every time | Scams target newcomers — vigilance required |
| Pays bills, rent, power and people in one place | Network or agent “float” hiccups happen occasionally |
Your M-Pesa setup checklist
- Land with your passport (original).
- Buy a Safaricom SIM (~KES 100) at the JKIA desk or a Safaricom shop.
- Register M-Pesa there with your passport (free).
- Set a secret 4-digit PIN you can remember.
- Load cash at the same desk or any M-Pesa agent.
- Install the M-PESA app if you have a smartphone (or learn
*334#). - Save Safaricom care (100) and your building’s agent location.
- Practice once: send yourself airtime, pay a Buy Goods till, read the Hakikisha name.
- Later: get your KRA PIN and bank account, then link the bank to M-Pesa.
- Set up Wise (or similar) to bring dollars in at a fair rate.
Frequently asked questions
Can a foreigner or tourist use M-Pesa in Kenya?
Yes. You don’t need to be a resident, hold a Kenyan ID, or have a local bank account or work permit. Any foreigner or tourist can register an M-Pesa wallet using a valid passport and a Safaricom SIM. The one catch is where you register: a foreign passport can only be processed at an official Safaricom shop or Care desk, including the desk in JKIA arrivals, not at a regular street agent.
What do I need to register for M-Pesa as a foreigner?
Your original passport and an active Safaricom SIM. Take both to a Safaricom shop, where staff record your name, passport number, nationality and date of birth, and your account activates by SMS within a few minutes. The SIM costs about KES 100 and opening M-Pesa is free. You’ll set a secret 4-digit PIN that authorizes every payment.
Is M-Pesa free to use?
Mostly, but not entirely. Registering, depositing your own cash, checking your balance, changing your PIN and buying airtime are free. Sending KES 1–100 to a person is free, and paying a shop’s Buy Goods till is always free. You pay a small fee, rising with the amount, to send more than KES 100 or to withdraw cash at an agent or ATM. For everyday spending, your fees round to almost nothing.
What’s the difference between Send Money, Buy Goods, Pay Bill and Pochi?
They’re the four ways to pay. Send Money pays a person by their phone number. Buy Goods pays a shop or café by its Till number and is free. Pay Bill pays a biller — rent, power, water, TV — using a business number plus your account number. Pochi la Biashara pays small informal traders like market vendors and boda riders, by phone number. Every business knows which one it uses, so just ask.
What are the M-Pesa transaction limits in 2026?
For a fully registered personal account as of 2026, a single transaction caps at around KES 250,000, the daily total at around KES 500,000, and your wallet can hold up to about KES 500,000 at any one time. These limits are set for anti-money-laundering reasons and sit far above everyday needs. For larger sums, like a property deposit, use a bank transfer instead. Confirm current limits on safaricom.co.ke.
Do I need a smartphone to use M-Pesa?
No. M-Pesa works on any phone through the *334# menu — you dial it like a number and a simple text menu appears, even without mobile data. If you have a smartphone, the free M-PESA app is nicer, with saved Till and Pay Bill numbers and your full statement. Both reach the same wallet and both end each payment with your 4-digit PIN.
Can I link M-Pesa to my Kenyan bank account?
Yes, once you have a bank account. You can move money between your bank and M-Pesa instantly, either inside your bank’s app or by using the bank’s Pay Bill number from the M-Pesa menu. Most banks let you top up your own M-Pesa for free. A common setup is to keep your salary and savings in the bank and load spending money onto M-Pesa once or twice a week.
How do I get money from the US onto M-Pesa?
The cheapest, clearest route is usually a service like Wise, which converts dollars to shillings at a fair rate and can pay into your Kenyan bank account or M-Pesa. M-Pesa Global lets people abroad send straight to your wallet, and remittance apps such as Sendwave, Remitly and Western Union can deliver to M-Pesa too. Compare the all-in rate, including the exchange-rate spread, not just the fee.
How do I avoid M-Pesa scams?
Keep your PIN secret — Safaricom, your bank and real businesses never ask for it. Ignore anyone who claims they sent you money by mistake and asks you to send it back; the deposit is fake. Read the Hakikisha name that appears before you confirm a payment, so you don’t pay the wrong number. Treat surprise reversal texts, prize messages and calls asking for codes as scams, and when in doubt, hang up and dial Safaricom on 100.
Final thoughts
M-Pesa is the first thing that makes Nairobi feel easy. Within an hour of landing you can pay for almost anything, no bank account required — and once you learn the five words (Send Money, Buy Goods, Pay Bill, Pochi, Hakikisha) you’ll handle money like someone who’s lived here for years.
Keep it in perspective. M-Pesa is your local spending cash, not your savings plan; hold dollars in your US accounts and bring them across as you need them. Register at a proper Safaricom shop, set a PIN no one can guess, read the name before you pay, and you’ll skip the few pitfalls that catch newcomers. Everything else is just tapping your phone and getting on with your day.
Related reading
- Moving to Nairobi: the complete guide — the hub that ties together every step of your move.
- Banking in Nairobi for expats — the bank account that sits behind your M-Pesa, and how to link the two.
- Opening a bank account as a foreigner — the permit-and-PIN sequence to get there.
- Sending money to and from Kenya — the cheapest ways to move dollars across.
- The USD to KES exchange rate — handling currency and getting a fair rate.
- Cost of living in Nairobi — what your money actually buys here.
Get a soft landing first
The simplest way to arrive is to have your first home already sorted, so you can set up your phone, your bank and your life without the pressure of house-hunting on day one. Our serviced apartments are all-inclusive — Wi-Fi, cleaning, backup generator and security — and a $50 deposit reserves your place, with the balance paid on arrival. Not sure which area fits your commute and budget? Our AI relocation assistant can shortlist options in a couple of minutes, any time of day.
Ready to look?
Find your apartment in Nairobi
Browse verified serviced apartments, or ask the AI concierge which area fits your life.